Introduction
To build upon the rapid deployment capabilities we introduced with Docker REDHAWK, we now bring you a distributed computing solution in the form of Docker Redhawk Swarm! Docker Swarm is the perfect companion to enable the greatest power of Redhawk: its capability to divide a complex signal processing task into components that can be distributed across a diverse set of devices. In this post, we walk you through the steps of setting up your Swarm, deploying Redhawk, and even integrating SDR and GPS platforms!
Prerequisites
Repository
Head on over to our GitHub page to clone the docker-redhawk-swarm repository to get the scripts and Docker Compose files used in this guide.
Docker
This guide requires that you have installed Docker CE and Docker Compose on each machine that you are using to launch the Redhawk application. For the purposes of following along with the command syntax in this guide, you should have a Unix-based operating system and the docker daemon should be configured to run with administrative privileges. Docker CE version 17.06.0-ce and Docker Compose version 1.15.0 were used for this guide.
- See the guide here to install Docker CE.
- See the guide here to configure the
dockerdaemon to have administrative privileges. - See the guide here to install Docker Compose.
Docker Images
The following Redhawk images are used to create the Docker Stacks. These images are pulled from Geon Technologies’ Docker Hub registry. Internet access to this registry is all you need!
geontech/redhawk-omniserver:2.0.6geontech/redhawk-domain:2.0.6geontech/redhawk-gpp:2.0.6geontech/redhawk-bu353s4:2.0.6geontech/redhawk-usrp:2.0.6geontech/redhawk-rtl2832u:2.0.6geontech/redhawk-development:2.0.6
Note: Swarm compatibility for these images was introduced with the
2.0.6-1tag of the source code.
In addition to the Redhawk images, we are also using the visualization tool from the Docker Hub Samples registry. This image is not required for the run-time capabilities of the Redhawk application, but it is useful to view the Docker Containers that have been deployed to Swarm Nodes.
dockersamples/visualizer
Using a Local Registry (optional)
If your machines do not have internet access or you want to build your own custom Redhawk images, you must set up a local Docker registry server. Setting up a local registry is outside the scope of this guide, but here is an overview of the process:
- Use our guide here to build the Redhawk images.
- Setup a local Docker registry server using the guide here.
- Tag each image with a prefix containing the hostname and port of the local registry instead of
geontech/, and then push the images to the local registry.
The following commands give an example of steps 2 & 3 above:
$ docker service create --name registry --publish 5000:5000 registry:2
$ docker tag geontech/redhawk-omniserver computer1:5000/redhawk-omniserver
$ docker push computer1:5000/redhawk-omniserver
Next, you will need to update the Docker Compose files and the Docker Engine running on each Swarm Node:
- Update the image names in
rh.ymlandrhide.ymlto have the prefix mentioned above. For example,geontech/redhawk-omniserver:2.0.6will be changed tocomputer1:5000/redhawk-omniserver. - Each machine will need the
"insecure-registries":[“computer1:5000"]key added to/etc/docker/daemon.jsonif your local registry server doesn’t have valid SSL certificates. If you want to use valid SSL certificates, see our guide here on setting up an SSL server with Let’s Encrypt.
Setting up the Docker Swarm
A Docker Swarm is a distributed computing cluster that is composed of one or more machines, or Swarm Nodes. The Swarm allows us to deploy Redhawk Docker Containers to multiple machines, achieving the goal of a distributed Software-Defined Radio processing environment! If you only have a single machine to create a Swarm and deploy your Redhawk application, that’s OK! Some of us just enjoy being a Swarm of one, so keep reading!
Initializing the Swarm
A Swarm must be initialized before Nodes can join the Swarm, and the machine that initializes the Swarm is automatically declared a Swarm Manager. A Swarm Manager is an active Swarm Node that controls actions for the Swarm, most notably deploying and removing Docker Stacks. Use the following terminal command to initialize the Swarm on a Manager:
$ docker swarm init
You now have a fully functional Docker Swarm comprised of a single Docker Manager!
Note: If you don’t have any more machines to add to the Swarm, you should skip to the “Deploying the Redhawk application on the Swarm” section.
In order to add Nodes to the Swarm, we first need to get the tokens that allow us to join the Swarm as either a Manager or Worker. Execute the following command from the Manager to get the Manager token:
$ docker swarm join-token manager
The output of this command has the following format:
docker swarm join --token [manager_token] [ip_address]:2377
Save this command to use in the following steps, or just use your eidetic memory to remember the Manager token and IP address.
In contrast to a Manager, a Swarm Worker is a passive Node that runs Docker Containers based upon the deployments from the Swarm Manager. We now need to get the token for joining a Worker to the Swarm:
$ docker swarm join-token worker
The of this command will look nearly identical to the output above, and only the token will be different:
docker swarm join --token [worker_token] [ip_address]:2377
Save this command also for use in the following steps.
Adding Nodes to the Swarm
Now that we have initialized our Docker Swarm and retrieved the tokens, we can start adding Nodes to the Swarm! Make sure you add a Node as a Manager if you intend to launch the Redhawk IDE from that Node. For production Swarms, you should follow these best practices.
Reminder: You must have Docker CE and Docker Compose installed on each machine you intend to join to the Swarm!
Execute the following command within the terminal of each machine that you would like to become a Swarm Worker, using the [worker_token] and [ip_address] from the “Initializing the Swarm” section above:
$ docker swarm join --token [worker_token] [ip_address]:2377
Execute the following command within the terminal of each machine that you would like to become a Swarm Manager, using the [manager_token] and [ip_address] from the “Initializing the Swarm” section above:
$ docker swarm join --token [manager_token] [ip_address]:2377
That’s it – the Nodes have been registered with the Swarm! To view all the Nodes in your swarm, execute the following command from the terminal of any Swarm Manager:
$ docker node ls
The Leader Manager status indicates the Node that initialized the Swarm, and the Reachable Manager status marks all other Managers.
Configuring a Node for a USB Device (optional)
Additional steps are required to configure a Node to use a USB device required by the Docker Images below. If you don’t intend to use any USB devices, you may skip this section.
geontech/redhawk-bu353s4:2.0.6geontech/redhawk-usrp:2.0.6geontech/redhawk-rtl2832u:2.0.6
The devices that are currently supported and tested are:
- USRP: Ettus B200 Mini
- GPS: bu353s4
- RTL SDR: NooElec R820T
The first step is to download and install the docker-swarm-usb package on each machine that has a supported USB device. The instructions for this installation are located in the README.md file of the repository.
The next step is label each Node with the device name. Execute the following command from any Swarm Manager for Nodes that have an Ettus B200 Mini attached:
$ docker node update --label-add "usrp_b200=true"
Execute the following command from any Swarm Manager for Nodes that have a bu353s4 GPS attached:
Note: Currently the bu353s4 must be mounted at
/dev/ttyUSB0, so make sure it is the first serial USB device you plug in to your machine!
$ docker node update --label-add "bu353s4=true"
Execute the following command from any Swarm Manager for Nodes that have an RTL SDR attached:
$ docker node update --label-add "rtl2832u=true"
Deploying the Redhawk application on the Swarm
In Docker language, each Docker Container that makes up the Redhawk application is considered a Docker Service. A collection of these services defined in a Docker Compose .yml file is considered a Docker Stack.
To deploy the Redhawk application, execute the following command from the terminal of any Swarm Manager:
$ ./rh start
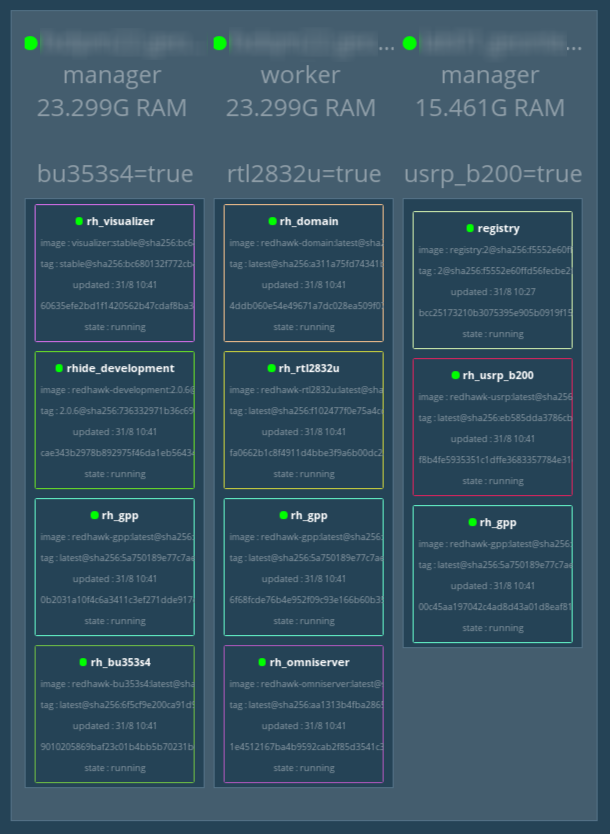
The Redhawk application is now deployed as a Docker Stack on your Docker Swarm! To view the Containers and the Swarm Nodes on which they were deployed, execute the following command:
$ ./rh
To remove the Redhawk application, execute the following command from the terminal of any Swarm Manager:
$ ./rh stop
To have a visual perspective of the Docker Containers and Swarm Nodes, open a web browser and navigate to http://[ip_address]:8080/ , using the [ip_address] from the Swarm Manager from above.
You are now ready to implement SDR waveforms in your distributed computing Redhawk application!
Deploying the Redhawk IDE on the Swarm
A separate Docker Compose file exists for launching the Redhawk IDE, meaning that a separate Docker Stack will be created for the IDE. Although the Stack is separate, it still shares the same volume and network created by the rh.yml file. Therefore, the rhide.yml file must be deployed after the rh.yml file.
To deploy the Redhawk IDE, execute the following command from the local terminal of a Swarm Manager with a display:
$ ./rhide start
The Redhawk IDE is now deployed on your Swarm, and the GUI is exported back to your display. Execute the following command to view any running Redhawk IDEs in your Swarm:
$ ./rh
To remove the Redhawk IDE, execute the following command from the terminal of any Swarm Manager:
$ ./rh stop
Currently only one Redhawk IDE may be deployed to the Redhawk Swarm at a time.
Stopping the Docker Swarm
To kill the entire Docker Swarm and disconnect all Workers, execute the following command from the terminal of all Swarm Managers:
$ docker swarm leave --force
To disconnect an individual Worker from the Swarm, execute the command above from the terminal of the Swarm Worker without the --force switch:
$ docker swarm leave
Troubleshooting
Here is a list of issues that you may face with their solutions:
- I can connect to my Redhawk Domain, but I don’t see all of my Devices! You may need to disable the firewall for all your Swarm Nodes to allow the Device Manager to connect. This behavior is documented in Section 2.3.1 of the Redhawk Manual.
- When executing
docker swarm initI receive the message, “Error response from daemon: –live-restore daemon configuration is incompatible with swarm mode”. Remove"live-restore":truefrom your/etc/docker/daemon.jsonconfiguration file. - When executing
docker swarm initI receive the message, “Error response from daemon: could not choose an IP address to advertise since this system has multiple addresses on different interfaces … – specify one with –advertise-addr”. Use the following format of the command:docker swarm init --advertise-addr.
As always, let us know how we can help you with all your Redhawk and SDR needs!