Introduction
A common misconception about REDHAWK and GNURadio is that they’re at odds with one another, perhaps enemies. The truth is each can support the other with a little bit of integration effort. In this post, we’ll be digging more into the details and usage of GNURadio-REDHAWK, which we discussed and released during the GNURadio Convention in 2017 (GRCon 2017).
If you saw the release at GRCon 2017, this post will be a good supplement to that presentation, as will this nice demo video.
Comparing Frameworks
Before we get started, let’s cover some rough equivalencies in terminology between the two frameworks.
| GNURadio | REDHAWK | Description |
|---|---|---|
| Block | Component | Individual piece of an SDR algorithm |
| Block (RTL, UHD, etc.) | Device | Hardware available to the algorithm |
| Flow Graph | Waveform | An SDR algorithm |
| Port | Port | Conveys the signal/data stream between algorithm elements |
| Variable | Property | A tuning or configuration parameter |
Now, on the one side, GNURadio has a large public following with example SDR algorithms. The typical Flow Graph’s various Blocks (generally) execute on a single host with the receiver hardware attached and explicitly specified as a Block the Flow Graph (RTL, USRP, etc.). To use some other receiver hardware with that algorithm, you change the Flow Graph to use a different vendor’s block(s). The algorithm and the hardware feeding it have a fairly strong association that in essence implies that the two coexist on the same host.
REDHAWK on the other hand is a distributed computing framework…that happens to be used for SDR. And because of a number of factors, REDHAWK’s public-facing support appears to be fairly small but is growing. In fact you’re likely here because of our own efforts the last few years to provide examples, blog posts, training videos, etc. As for the framework itself, similar to GNURadio, algorithms are comprised of individual processes. However different from GNURadio, those processes can be distributed across a network of processors. Moreover, the algorithm does not get defined with its receiver hardware. Instead, the signal characteristics that the algorithm needs are described using Front End Interfaces (bandwidth, sample rate, center frequency, etc.). This ensures the algorithm remains hardware agnostic, easily distributed even across racks of equipment.
So: Why Integrate?
Succinctly: intellectual property re-use and performance.
GNURadio’s community has a number of ready-made algorithms for a number of signals, but lacks the infrastructure to execute in a distributed fashion. REDHAWK on the other hand has an extremely high-performance infrastructure for distributed computing, but not much in the way of publicly-available complete algorithms. If we decouple a GNURadio Flow Graph from its explicit receiver requirement in favor of signal characteristics, we can deploy those algorithms into a distributed processing environment via REDHAWK.
It’s a win for both communities. GNURadio users gain distributed deployment capabilities and performance. REDHAWK users can re-use a library of existing IP (intellectual property) in Waveforms.
Cats and Dogs, living together!
GNURadio-REDHAWK
The GNURadio-REDHAWK project’s goal is to setup an easy-to-use baseline for pulling in existing Flow Graphs into REDHAWK as Components. It has two core projects and two existing deployment strategies.
REDHAWK Integration Python
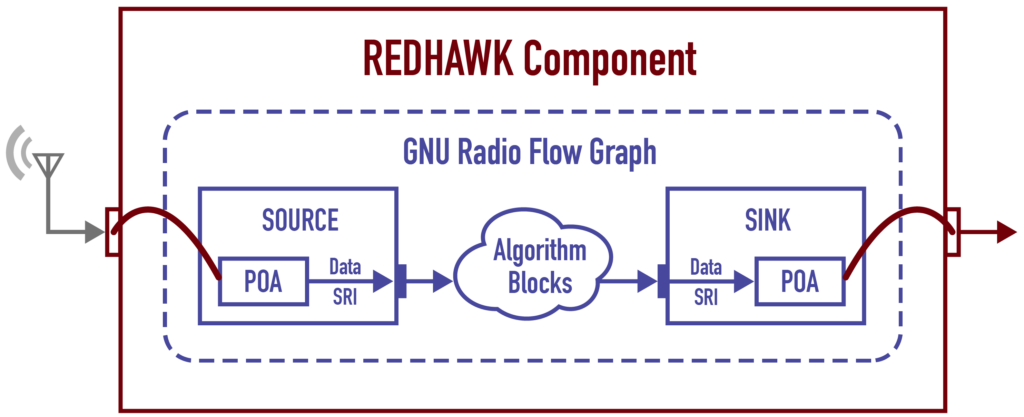
One of our engineers, Drew Cormier, envisioned a simple concept to address the hardware coupling in Flow Graphs. It is straight-forward: replace the Flow Graph’s hardware-related Blocks with source and sink Blocks that can directly communciate with REDHAWK Ports. Then develop REDHAWK Component that controls the Flow Graph and maps the Variables and Ports to its own Properties and Ports, respectively. Finally, treat the new Component like any other by using it in a Waveform. Simple.
Yes, but how?
Well, how about some background, first? REDHAWK Components (and indeed others) have a method named getPort() which is called as part of the process for when connecting one port to another. That method returns the CORBA Portable Object Adapter (POA) for the port to the caller. And not to gloss over too many details, but that exchange is the part of the process that allows data to flow between two ports either over a network, a local UNIX socket, shared memory (a 2.1+ feature), etc. — all without the end user having to make that choice (the REDHAWK Core Framework handles it automatically).
Where these new source and sink Blocks come into play is that each is a standard GNURadio Block with a REDHAWK Port embedded within it. Each call of the GNURadio Block work() method results in exchanging the data, SRI, and time stamp with REDHAWK (presently, only BULKIO is supported). And because the blocks are also a REDHAWK Ports, the Component controlling the Flow Graph simply implements getPort() to return each block’s POA in place of its own port(s), as appropriate. Basically, this:
Python? At this time, both blocks are implemented using Python purely out of simplicity for this initial capability. Nothing technical would prevent someone from implementing the source and sink in C++ (so, please feel free to submit a pull request if you do :-)).
The Component that our tooling generates is also Python. However, because it’s not manipulating the data, its implementation language should not impact performance at all.
Component Converter
The second core project to the effort is the Component Converter. It was developed by one of our University of Maryland interns this year, Chris Conover. The tooling greatly simplifies the process of converting a prepared GRC XML file into a REDHAWK Component, making it basically turn-key to from one to the other.
The process flow is this:

The GRC is parsed for:
- Options block
- Any variables referenced by other blocks
- References to the REDHAWK Integration Python blocks
From the options block, the tooling learns the class name of the implementation (from the ID), among other details. Those details become the Component’s SPD XML project definition.
Note: the tooling also squashes any GUI dependencies in the Flow Graph’s
optionsblock (because GPPs do not have a display).
The variable blocks are filtered down to those that are both setting the value and referenced by some other block in the Flow Graph. The data type for the variable is interpreted from its value (presently, only scalar values and strings are supported). Each of these variables is then added to the Component’s PRF XML, which defines its Properties in REDHAWK. The variable’s name is prefixed with gr:: and gr_ for the related REDHAWK Property ID and Name, respectively (this is just a common convention and preparation for more type support).
The source and sink blocks that are found in the Flow Graph are translated to Ports in the Component’s SCD XML. Again, the ports that will be added to the Component as a result of this are only notional — placeholders. The Component will use these names in its getPort() implementation to return the related Block’s POA in place of its own related port.
The tooling then uses the GNURadio GRCC package to convert the GRC into its Python runtime wrapper to be included in the Component’s project.
Finally, the converter provides a Jinja2 template that, by way of the REDHAWK Code Generators, backfills all of the glue code into the Component definition. This is how the property listeners are mapped to the variable set and get functions on the flow graph wrapper and getPort() is implemented.
So to summarize, the Component Converter trades you all of the …Fun of having to know both frameworks for a nearly turn-key operation. A GNURadio developer should not have to know REDHAWK, at all, to deploy their Flow Graph in it as a Component using this tooling.
Deployment Strategies
Currently, the project supports two different deployment scenarios with the same rule:
The Component must execute in an environment that has both REDHAWK and GNURadio installed.
A similar corollary can be said about each of those frameworks individually, right? It bore stating though since it has some particular implications depending on the scale of your REDHAWK Domain and what base OS you are using (i.e., standard REDHAWK supported install in CentOS or something else).
Traditional
The first deployment strategy we’ve called Traditional because it requires no use of container technology to help grease the skids, as they say. Instead, your REDHAWK system administrator configures GPP -bearing Device Manager(s) with GNURadio and gives the user that is running the Device Manager’s process rights and environment configuration to access GNURadio. So, if your GPP’s host is running CentOS 7 and a standard REDHAWK installation, that means installing GNURadio in CentOS 7. Now, how does the rule apply in this case?
Let’s say you’re running a REDHAWK Domain that has several GPPs in it. Applying the rule in this case means your administrator either has to provision every GPP with GNURadio, or you have to manually specify which specially-provisioned GPP executes this Component (taking care to only select one(s) that have been provisioned). If your Flow Graph has other library dependencies outside of the core GNURadio set, rinse and repeat the above for all of its dependencies as well.
Note: in REDHAWK 2.1+, Components can have dependencies on like this (the feature is referred to as special snowflake), which simplifies that situation considerably, however REDHAWK 2.0 users do not have this feature and must adhere to the above.
Naturally, this all implies that your development environment will also need GNURadio and REDHAWK installed since the conversion tooling makes use of GNURadio’s own Python packages for converting the GRC to its Python wrapper.
While it may sound like we’re listing nothing but disadvantages for this approach, it really is end-user specific whether or not any of the above is actually a burden. Any number of additional technologies can be used to automatically maintain the provisioning of a multitude of GPPs. For example, install GNURadio into our Docker GPP runner and have a cron job that pulls the image periodically to update it with more dependencies.
Docker-Aware
This deployment strategy makes use of our Docker-based Components (blog and docker-components-video) strategy wherein the Component is executed within its own, specialized environment that can be very different than the rest of the REDHAWK Domain. Again though, the one rule must not be violated: the Component’s image must contain REDHAWK and GNURadio.
And… we took care of that already, so you don’t need to worry about it going this route.
Part of this deployment strategy is swapping out GPP(s) for Geon’s extension to the standard REDHAWK GPP (a.k.a., docker-gpp). This GPP has allocable properties for the Docker image and volume(s) that a Component can depend against, which ensures that it can only be deployed at a GPP that has been provisioned for the Component’s specific runtime environment. The GPP also has additional execution code that reads certain command line parameters off the Component to formulate the resulting docker run... command. And thanks to CORBA, everything is connected together seamlessly as the Component executes within its own, special environment needs.
As part of this deployment strategy, we provide both GPP and Development -specific build needs, separately. A GPP host’s needs are the modified Docker-aware GPP and a base Component runtime image (geontech/gnuradio-redhawk-runtime). The Development environment’s needs include the runtime image and add a development image with some scripts to handle running the GNURadio Companion and the REDHAWK IDE, concurrently, as well as the Component Converter. The main requirement is that the host also has Docker installed (tested at this time against Docker-CE 17.0).
Note: for the UIs to work using the provided scripts, the host also needs to be running Linux and bash greater than or equal to 4.
Filed under More Good News, the Component Converter also has flags for the conversion process. These are --docker-image and --docker-volume (required and optional, respectively). The generated Component project will come pre-configured with the above property dependencies and command line properties as well as a Dockerfile for the Component’s specific runtime environment and a small script to build that image, tagged with the name you provided.
Example
For this example, I’ll have a standard CentOS 7 installation on my host running REDHAWK 2.0.6. It is running a Domain as well as the GPP. In this case, we’re going the Docker-Aware) route, are picking up from where we have already run make development gpp to build the development and runtime images as well as install the Docker-GPP.
Our Flow Graph is a basic FM receiver, which has had the receiver and GUI components stripped from it. It is included in the REDHAWK Integration Python, here: gr-redhawk_integration_python/examples/fm_demod.grc.
1. Starting the Companion
Let’s start the GNURadio Companion then with a directory containing the fm_demod.grc on the Desktop mounted as the workspace.
$ mkdir ~/Desktop/integ-workspace
$ ./gnuradio-companion --workspace ~/Desktop/integ-workspace
Note: You may see a warning that the OmniORB server isn’t running. That’s fine. Part of the script is from Docker-REDHAWK which tries to detect the OmniORB container and automatically configure other containers. All it’s saying is it can’t find the container, and you didn’t specify the address of your OmniORB server (
--omni). But that’s fine, we don’t need access to it in the container.
You should now see the GNURadio Companion. If you open the Flow Graph you just downloaded above, you’ll probably see this:

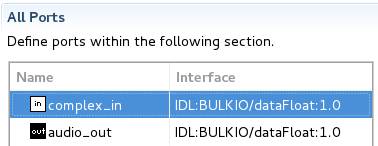
Double-click the source and sink blocks. You’ll see each has the ID of complex_in and audio_out, respectively. These block IDs become the Port names in REDHAWK later, so be specific. And because REDHAWK detects complex data using the mode flag in the SRI, I would encourage naming any complex sources or sinks with complex so the end user knows to only connect signals where the mode is 1.
Specifically on the sink, those familiar with the Signal Related Information may recognize a few fields. This is how you populate parts of the SRI that gets pushed back into REDHAWK so that you can correctly describe your data. In this case, it’s time domain data. It’s worth pointing out here too that if the REDHAWK stream tag arrives at a sink, the stream ID and keywords will be updated using that tag’s SRI structure.
Feel free to look at the variables as well and other blocks. These are all basically straight out of the example with the exception of volume control.
2. Conversion
If we leave the GNURadio Companion running in its container, we can simply re-use that container with the convert script by specifying --use-dev. The arguments for the GRC file and output directory become relative to the user’s workspace within the container. In our case,
$ ./convert fm_demod.grc --use-dev --docker-image fm-demod
Skipped substitution for: class top_block\(.*\):
fm_demod
Component fm_demod
  build.sh
  fm_demod.spec
Tests fm_demod
  tests/test_fm_demod.py
Implementation: python
  python/fm_demod_base.py
  python/fm_demod.py
  python/configure.ac
  python/Makefile.am
  python/Makefile.am.ide
  python/reconf
  python/../Dockerfile (added)
  python/../build-image.sh (added)
Note 1: the tool used the GRC file name as the Component name.
Note 2: the image name you specify can contain a tag, digest, (
:1.0, for example) or other information.
If you look now in your ~/Desktop/integ-workspace/fm_demod directory, you’ll see your fully-functional REDHAWK Component:
$ cd ~/Desktop/integ-workspace/fm_demod
$ ls
build-image.sh  fm_demod.prf.xml  fm_demod.spec
build.sh        fm_demod.scd.xml  python
Dockerfile      fm_demod.spd.xml  tests
Painless so far, right?
3. Installation
Recall, in this example we’re running on a standard CentOS 7 -based REDHAWK Domain with our Docker-GPP installed since we’re on the [Docker-Aware][docker-aware] approach. So what we need to do now is install the Component in our Domain (SDRROOT) and then ensure the Docker image for the Component’s runtime environment is available to the GPP.
Installation is the same as for any other Component:
$ ./build.sh install
A few moments later, the Component is installed in the $SDRROOT/dom/components for use by Waveforms.
But there’s another step since this Component is going to execute in its own special Docker Container. And so on the Docker-aware GPP host, we run:
$ ./build-image.sh
This image inherits from the geontech/gnuradio-redhawk-runtime image which is the lionshare of dependencies (hence, it’s large). However the plan is to provision the GPPs with the runtime image first, and then if you setup a container repository for example, pulling these component images is a snap since the extra layer for just the Component is very small.
Verification
Open the REDHAWK IDE on the host system and expand the Target SDR, Components list. You should see your new Component. Double-click to view it.
Note: the REDHAWK Code Generator output does not include the IDE’s additional project files at this time. Therefore to view the Component, you have to open the SPD XML, which is effectively what we just did by opening it from the Target SDR list.
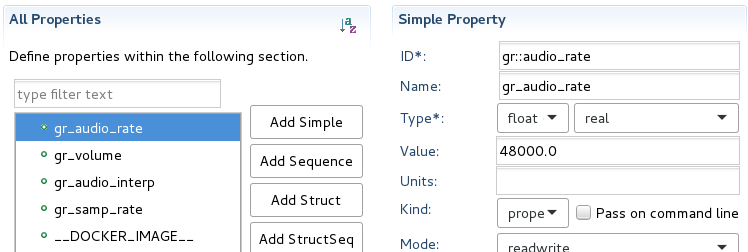
In the Properties tab, you can see the various properties, prefixed with gr.... And since this is will be requiring a Docker-GPP for deployment, the __DOCKER_IMAGE__ was also added, preset to the image name provided earlier.
The Ports tab shows the Block IDs for any sources or sinks found in the Flow Graph. Each is now mapped to its approrpiate BULKIO data type.
Finally, the Implementations tab has one implementation, our Python -based component. Again, because it will be requiring the Docker-GPP, it has an allocation dependency for its docker_image.
…And you still haven’t had to write a single line of REDHAWK code.
We’re ready to deploy the Component in a Waveform.
4. Waveform
Remember, Components are roughly equivalent to Blocks, so the one that was generated needs to be used in a Waveform. So back in the REDHAWK IDE, we select File, New, REDHAWK Waveform Project.
Give the Waveform a name like FM_Waveform and press Next. You should be able to see fm_demod as a Component you can select for your Assembly Controller (i.e., the first Component to start, see Waveform Usage for more info.). Then press Finish.
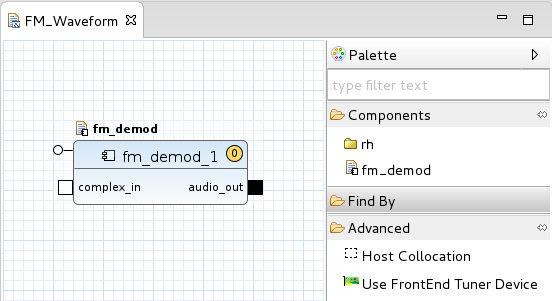
Next we have a couple of options. We can either add the Use FrontEnd Tuner Device reference to the Waveform so that anytime it launches, REDHAWK tries to find a receiver with our specifications, or we can allocate a Device and manually connect it to a running instance of our Waveform. We’re going the manual route right now, but if you’re interested in learning more about Waveforms, checkout our waveform-basics.
Installation
Drag the FM_Example project from the Project Explorer panel (left) over to the Target SDR (right). This installs the Waveform into the local SDRROOT, making it available for our locally-running Domain.
5. Run the Waveform
At this point we have a Domain with our Component (Flow Graph) installed and a Waveform referencing it. And at our Docker-aware GPP, we have built and installed the Component’s runtime image. Now we can run our flow graph.
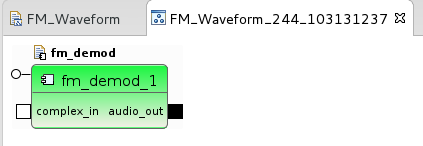
Right-click the Domain and select Launch Waveform. Select your Waveform (FM_Waveform) from the list and check the box to automatically start. Press Finish. A few moments later, you have this:
Note: If you check the GPP’s console output when the Waveform starts, you may see:
/root/.gnuradio/prefs/vmcircbuf_default_factory: No such file or directory vmcircbuf_createfilemapping: createfilemapping is not available. That’s fine — it does not impact your Component’s running the Flow Graph.
6. Connect to Data
Remember, our Flow Graph now has no hardware dependency since there are no blocks for specific receivers. It is now hardware agnostic only requiring something to provide it a 256Ksps signal of complex floats…preferably containing active FM channel, right?
We’ll run through the process of connecting manually. This entire process can be automated by REDHAWK using the little reference: Use FrontEnd Tuner Device (see Waveform Basics).
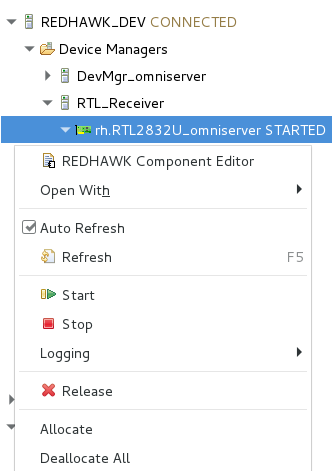
First, right-click on your FEI Receiver and select Allocate. In my case, I have an RTL Device in my Domain.
Next, pick an FM station you know is active. I’ve picked 103.5 MHz for the demo video being recorded as I write this post. The RTL device requires the bandwidth and sample rate to be the same value, so here I’m setting them both to 250 KHz and 250 Ksps (note, these are in Megahertz/Megasamples, so 0.25 is appropriate).
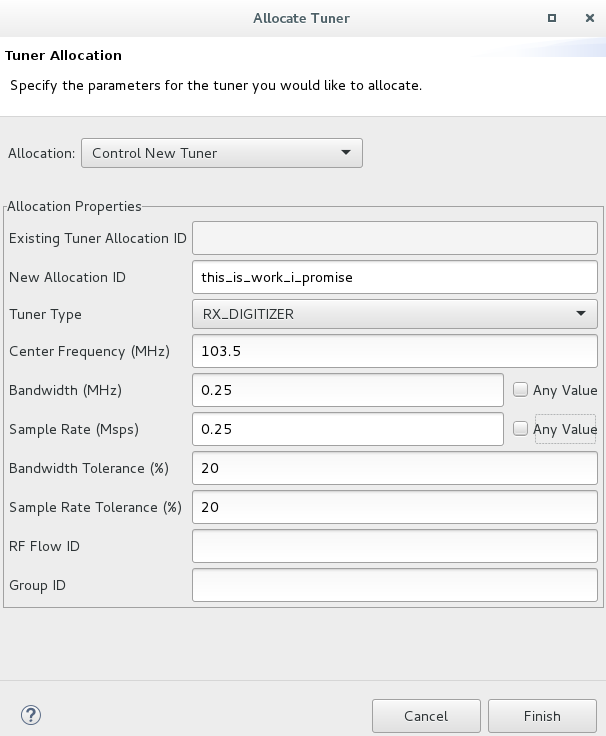
Press Finish to allocate the receiver. Then under FrontEnd Tuners, right-click our allocated RX_DIGITIZER and Plot Port FFT from the dataFloat_out port.

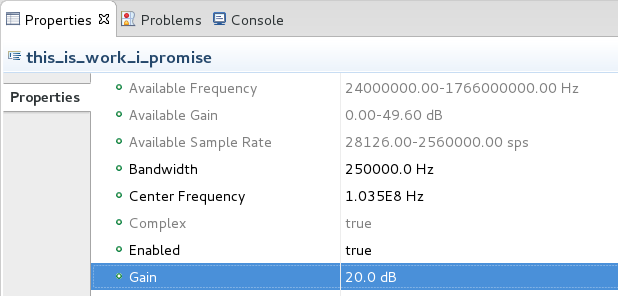
We have a solid signal. If you need more gain or to adjust other FrontEnd Interfaces -related features, left-click the allocated RX_DIGITIZER and look around in the Properties tab (bottom of the screen).
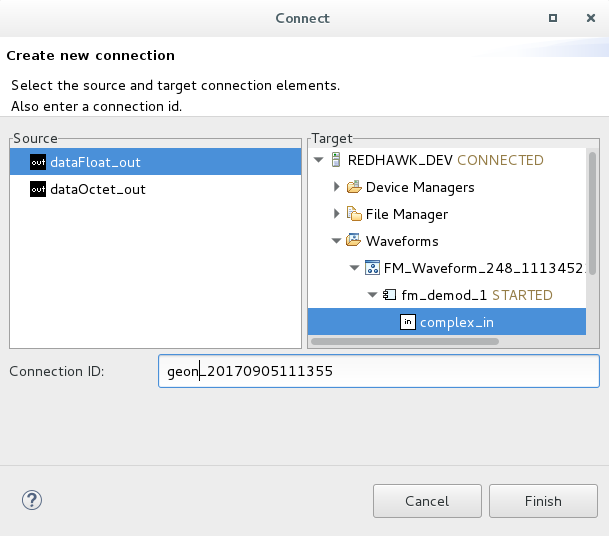
To connect this to our waveform, right-click the RX_DIGITIZER and select Connect. In the left panel, select the dataFloat_out port. In the right panel, navigate to the component and select the complex_in port:
Finally, right-click the audio_out port of the Component and select Play Port. After a few moments, you should begin hearing audio from the channel that you have tuned.
Conclusion
Congratulations on making it this far, on what was a lengthy dive into Geon’s GNURadio-REDHAWK Integration Package. There is a lot more information in the README files of that repository-of-repositories, so dig into it. Hopefully your team will find this to be a great enabler for pulling in GNURadio IP into the distributed computing framework of REDHAWK. And if you do, please give us some feedback, star the repository, or join in the conversation. As always, we love feedback and contributions from the community.
Important: If you have any concerns or would like to contribute more directly to this or other projects, please feel free to submit pull requests or contact us directly through the website. Let’s make something great!

