A few months back, I was tasked with integrating the functionality of Ettus’s RF-NoC (RF Network on Chip) with the capability of REDHAWK. Luckily, there was already a pattern for this provided by the developers of REDHAWK: the Persona Device Pattern. At the time of this writing, the documentation for this pattern can be found in Appendix G of the REDHAWK manual. However, while this documentation provides a great high-level overview of integrating FPGAs with REDHAWK, the devil is in the details, as I would slowly find out. With all of that in mind, in this post I will explain the design of the Persona Device Pattern before discussing specific implementations I wrote for both a ZedBoard/AD9361 platform and RF-NoC on the E310.
The Pattern
The following sections describe the design pattern for developing Programmable and Persona Devices.
Programmable and Persona Devices
If you’ve used REDHAWK, then you’ve almost certainly encountered Devices. Whether in the form of the GPP, which represents the state of the processor for a given host, or an FEI Device, which represents various types of radio tuners, these resources are responsible for hardware assets in a system. So it makes sense that a Device would be used to represent a piece of hardware like an FPGA. Where the FPGA differs, however, is in its inherent transience. While the other types of Devices generally have a set behavior and interface, an FPGA can be loaded with a new bit file and act like a completely different machine. So what is the best way to represent this technology in REDHAWK without developing a custom set of interfaces for each and every application?
This question is answered by the Persona Pattern, in which there are two types of Device in use. The first, the Programmable Device, acts as an interface to the FPGA hardware by allowing requests to load bit files when the physical device is not already in use, and denying these requests otherwise. The second type of Device is the Persona Device, which makes requests to the Programmable Device to load the hardware and, if successful, interacts with the instantiated hardware through whichever interface that specific load exposes.
Example
An example seems like a good idea at this point. Let us assume our target is the ZedBoard, a platform which contains both a PS and PL in the same die. The PS is running Linux, with REDHAWK installed, and can program the PL with a desired bit file. Normally, in order to enable a specific capability, a user would load the correct bit file to the FPGA, then run the executable designed to interact with that bit file load. This interaction may be via mapping /dev/mem to registers, interacting with a library or driver, etc. If the user later required a different capability from the FPGA, they would simply stop the executable, load a different bit file, then run yet another executable designed to interact with the new bit file load.
In order to migrate this workflow to the Persona pattern, a few steps are necessary. First, the executable functionality should be integrated into a Persona Device, adhering to the interfaces and implementing methods provided by such a Device. Second, the Persona Device should be associated with the path of the bit file, either through a property or hard-coded into the Device itself. Finally, the ability to load the bit file to the FPGA should be implemented in the Programmable Device.
Once these Devices exist, they must then be aggregated into a DeviceManager on the ZedBoard as an AggregateDevice. For those not familiar with this type of Device, it is an interface that can be added to a Device which allows other Devices to add themselves to the parent AggregateDevice. In this way, the lifecycle of the child Devices can then be controlled by the parent Device rather than the Device Manager. This can be accomplished by ensuring that the Programmable Device inherits this interface in its SCD file. Finally, the relationship between the Programmable (AggregateDevice) and the Persona (Device or ExecutableDevice) can be defined in the DeviceManager.dcd.xml.
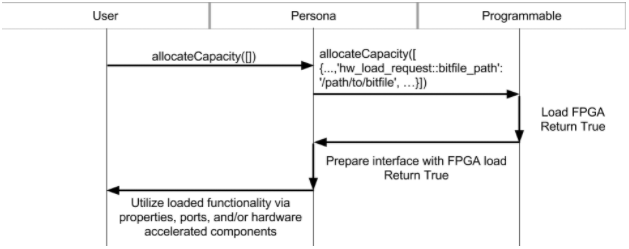
When this DeviceManager is launched, the Programmable Device will be instantiated first, but won’t do anything yet. Next, the DeviceManager will notice the relevant XML tag for the Persona Device, and will request that the Programmable Device execute the Persona Device and add it to a list of Devices owned by the Programmable Device. At this point, both Devices are running, but nothing has happened. To execute the functionality, it is necessary for the Persona to be loaded by performing an allocateCapacity call against the Persona Device itself. For now, this call doesn’t require any arguments, but some may be added later, depending on the use-case. This call will cause the Persona to make its own allocateCapacity call on the Programmable Device, which in turn will load the FPGA with the Persona’s bit file. If this second allocateCapacity call succeeds, it will return true to the first allocateCapacity, alerting the Persona of the success. Now the Persona Device can prepare any interfaces necessary to communicate with the bit file load before returning true to the original user. Finally, the FPGA is loaded and the software is executing!
Complexity
For those of you keeping score at home, that’s 2 paragraphs to describe the basic workflow, and 4 to describe the Persona pattern. Which begs the question: Why use the Persona Pattern at all? Well, if your use-case is as simple as above, that is, one bit file and one executable, then the Persona pattern is probably overkill, and a single Device would suffice. But if you have 2 bit files, or 20, all with slightly different Personas, then the Persona Pattern begins to seem less complex.
First, all common functionality can be consolidated into the Programmable Device, such as loading the bit file, communicating with radios, unbinding and binding drivers, etc. Second, the Persona’s functionality and bit file location are combined in a single place. Finally, the entire potential system is described in one spot, the DeviceManager.dcd.xml file. Combine these features with REDHAWK’s ability to distribute functionality and monitor utilization, and you now have several hardware accelerated capabilities available not only to the machine with the FPGA, but all users on the Domain.
Hardware-Accelerated Components
If you were paying attention to the above, you may have noticed that I referred to the Persona Device as either a Device or an ExecutableDevice. The reason for this is use case dependent:
- Device: This basic type of Device is appropriate for simpler Personas, usually those in which all of the bit file load’s functionality is controlled by the Persona itself
- ExecutableDevice: This type of Device is appropriate for more complex Personas, in which some or none of the bit file load’s functionality is controlled by the Persona, but by Components which are executed by the Persona
With the latter form of Persona Device, functionality not controlled by the Persona is available to Hardware-Accelerated Components.
The mechanism for executing these Components on the Persona, rather than on the GPP, is via the processor name, os name, etc in the Component’s SPD file. By setting these elements to match those of the Persona, the REDHAWK Domain Manager is able to correctly associate the two resources at runtime. Any code required to interface with the portion of the FPGA load controlled by the Component should be compiled into a shared library and provide an interface to the load via properties and/or ports. While this code will run on a regular processor, the core functionality (FFT, FIR filter, etc.) will be performed on the FPGA.
Implementations
Now that the general design pattern has been outlined, let’s look at a couple of implementations currently in use at Geon.
ZedBoard/AD9361
The first example of a Persona Pattern implementation was done using a ZedBoard loaded with a custom FPGA load built upon the Analog Devices, Inc. hdl project for the FMCOMMS3 board. To begin the implementation, I started with the Programmable Device, which would be responsible for loading bit files and controlling the AD9361 front end hardware. In order to load the bit files, the Device was written to adhere to the hw_load_request allocation structure, which specifies, among other properties, a path to the bit file to be loaded. This file could then be read into memory before being written back out to a file available from Xilinx, /dev/xdevcfg. This was equivalent to running the following command:
# cat /path/to/bitfile > /dev/xdevcfg
Which is the normal command for loading a bit file to the PL on the ZedBoard.
Next, the front end control of the Programmable Device was achieved using the libiio library to translate REDHAWK FEI requests to tuning commands on the radio hardware loaded in the FPGA. At this point, the Programmable Device was fully completed, and it was time to implement the Persona Device.
This particular Persona was required to load the Programmable Device with a bit file containing the radio interfaces (2 RX and 2 TX radios) and a sample hardware module with memory mapped registers. Once the bit file was loaded, the Persona would then demonstrate the ability allocate one of the RX tuners, connect the Programmable Device to itself, and potentially monitor the incoming signal for energy. When energy was detected, the Persona would set a property on the hardware register enabling processing in the FPGA, and when the energy was not detected, it would disable hardware processing.
Implementing this Device required populating the aforementioned hw_load_request allocation structure and allocating the Programmable Device. Once the Programmable Device had successfully loaded the bit file, the Persona would then map the correct portion of memory for the register and enable a property listener for a user to get and set the register value. Finally, the Persona would allocate an RX tuner on the Programmable Device, call connect with a connection ID matching the allocation ID used on the Programmable, and then receive the data from the tuner.
And that’s it! With these two Devices programmed and configured in a node, this capability could be extended to any existing REDHAWK Domain with minimal integration effort. An example of this implementation can be seen at:
The related detailed write-up of that project is here.
RF-NoC
The previous example did not require Hardware-Accelerated Components, so it’s appropriate that this one does. For those not familiar with RF-NoC, it provides users the ability to connect blocks within an FPGA at runtime, allowing for multiple configurations without reloading the hardware.
To begin, the Programmable Device was once again designed to load bit files and control the front end hardware. In this case, the bit file loading was accomplished via the UHD library provided by ettus, while the front end hardware control was done via communicating with the Radio, DDC, and DUC blocks in the FPGA load.
With the Programmable Device completed, a Persona built to load a particular bit file and control access to the blocks within was necessary. This Persona could then either connect and control the blocks itself, or execute Components which would control specific blocks and connect them appropriately. To start, a Persona which simply executes Components was built.
Next, Hardware-Accelerated Components were designed to control the RF-NoC FFT and FIR blocks, as well as a custom decimate block. The two components, psd and TuneFilterDecimate, were forked from the redhawksdr github and had an RF-NoC implementation added to their SPD files. Next, the property change listeners and SRI manipulation necessary to make these Components appear identical in functionality to their software counterparts were added.
With the two Devices and Components now implemented, the last step was to enable the Persona Device to dynamically connect the RF-NoC blocks at runtime based upon the connection of the RF-NoC Implementation Components in a REDHAWK waveform. This was accomplished via connection callbacks in the Components and communication with the Persona to determine which RF-NoC blocks corresponded to these components. Thus, a completely new FPGA capability can be defined using the REDHAWK Waveform Editor to connect RF-NoC Implementation Components without knowledge of FPGA design.
An example of the majority of this functionality can be found at:
Conclusion
Although the Persona Device Pattern is an advanced REDHAWK topic, it clearly allows for the custom capabilities of an FPGA to be extended to a Domain with minimal integration effort. Hopefully this post has demonstrated how the pattern can be used effectively and sheds some light on the implementations used by Geon to date!