Introduction
In the previous two posts, we covered first setting up SSL registration and automated maintenance using a Docker container from LinuxServer.io for Let’s Encrypt’s services, and then followed it up with enabling encrypted HTTPS and Container Repository on a GitLab server. So what’s next on the list for fully-functional Continuous Integration (CI)? Runners.
A GitLab Runner will let you delegate a system’s resources in your office to handle CI tasks (i.e., Jobs in a Pipeline). This means that once you configure the runner, you can bring it up and down using a schedule, if you would like, so that perhaps by day it’s a walk-up workstation, and by night it’s handling some of your nightly builds.
The Runner supports many types of runners from indivdual instances up through Swarms. For this post however, we’ll focus on specifically registering runners of two types of individual runners, Shell and Docker.
Note: it’s not required to setup SSL and HTTPS in order to use CI pipelines. However it does greatly simplify things, as shown previously, once you start talking what kinds of builds you plan to use.
Pre-flight
First things first: the runner requires either Docker executor or Docker to be installed on the host. Take your pick.
If you have Docker installed on the system, be sure to enable and start the daemon (systemctl enable docker && service docker start).
A Short Composition on Compose: I would recommend also installing Docker Compose if you also have Docker installed. It’s a great way to represent a whole system integration, and its definition is reusable outside the confines of the CI environment to actually run your system.
Installing the Runner
Much more detailed instructions are available on GitLab’s website, however this is a short summary with the necessary important bits retained.
To install the runner via GitLab’s recommended repository (either Debian or CentOS):
# For Debian/Ubuntu
curl -L https://packages.gitlab.com/install/repositories/runner/gitlab-ci-multi-runner/script.deb.sh | sudo bash

# For RHEL/CentOS
curl -L https://packages.gitlab.com/install/repositories/runner/gitlab-ci-multi-runner/script.rpm.sh | sudo bash
Note: Debian users should use APT pinning
Since Debian Stretch, Debian maintainers added their native package with the same name as is used by our package, and by default the official repositories will have a higher priority.If you want to use our package you should manually set the source of the package. The best would be to add the pinning configuration file. Thanks to this every next update of the Runner’s package – whether it will be done manually or automatically – will be done using the same source:
cat > /etc/apt/preferences.d/pin-gitlab-runner.pref <<EOF
Explanation: Prefer GitLab provided packages over the Debian native ones
Package: gitlab-ci-multi-runner
Pin: origin packages.gitlab.com
Pin-Priority: 1001
EOF
Then install using the package manager:
# For Debian/Ubuntu
sudo apt-get install gitlab-ci-multi-runner

# For RHEL/CentOS
sudo yum install gitlab-ci-multi-runner
At this point you’ve accomplished enough to use the runner locally to execute .gitlab-ci.yml jobs. We’ve provided in the next two subsections examples for locally running a shell and docker executor. Our next blog post will cover a much more detailed Docker example, so when you’re finished reading over these two, move on to Registration.
Note: A key take-away with the below test runs is that changes in your local repository must be committed for the runner to fetch them.
Local Test: Shell Runner
If you configured a shell runner, create a directory with the following .gitlab-ci.yml:
stages:
  - test

test_job:
  stage: test
  script:
    - ps -ef
Then commit the file (git init && git commit -am "initial commit") and run the job:
$> gitlab-ci-multi-runner exec shell test_job
#
# It will print the output of ps -ef to the screen
#
Running after script...
Job succeeded
Note: In this case, the process is executing as your user. Whatever your user can do, the runner can do. The daemonized version we’ll be setting up later will be running as the
gitlab-runner, which likely has fewer permissions than you.
Local Test: Docker Runner
Back at the host where a Docker runner is executing, create a directory with the following .gitlab-ci.yml file in it:
image: docker:latest

stages:
  - test

test_job:
  stage: test
  services:
    - docker:dind
  script:
    - docker info
Commit the file (git init && git commit -am "initial commit") and run the job:
$> gitlab-ci-multi-runner exec docker --docker-privileged test_job
#
# It will print the 'docker info' of the host's daemon which is being
# mapped by way of the 'docker:dind' (docker in docker) service.
#
Running after script...
Job succeeded
Runner Registration
You will need to obtain the REGISTRATION_TOKEN from your GitLab server’s admin area () or from your project’s own Pipeline’s area (if you have high enough permissions). Then register your runner with the server.
It is probably worth mentioning that when you run the register commands in these next sections, it will ask you, again, to confirm all the provided settings plus give you the chance to set other values. It does feel odd to repeat oneself, however it is a good sanity check.
Notes on Tags
Let’s take a brief moment before we get to registration and talk about Tags. It is becoming such an overloaded term, especially considering it is being re-used to describe two different concepts.
On the one hand, git uses tags for marking specific commits in your history, for example: releases. We’re all familiar with that one.
This feature of the same name is for coupling a CI Job to a specific Runner (should you choose to enable it). In both cases you can list multiple tags. One way you might consider using this is to advertise specific features of a runner. For example, use vivado to indicate the runner has Xilinx Vivado installed. A job in your pipeline can then list vivado in its tags, and a runner with vivado will automatically get tasked once free.
Register: Shell Executor
The shell setup has this set of features. A general template for this registration method is shown here:
# gitlab-ci-multi-runner register \
  --url  \
  --registration-token REGISTRATION_TOKEN \
  --description "YOUR DESCRIPTION" \
  --executor shell
In this case the runner is in the shell, which means among other things, if you have to install packages for your build, you’re actually installing them on that runner’s host OS. Which means of course if you want your runner to be able to install packages, you end up having to give your runner access to your package manager. Cringe…
On the other hand, it also means that the runner has access to whatever software is already installed. As mentioned before, combined with Tags, you can basically advertise those packages to Jobs, and as long as your environments between runners are kept in sync, Jobs will be able to execute across multiple systems. That is pretty slick.
So what if the gitlab-runner (user) has access to something like the Docker daemon (e.g., group membership)? The runner will be able to use Docker (docker, docker-compose, if installed, etc.) to manage job environments during tests. Awesome power.
Security Warning: Re-read that previous paragraph. If you do this, a malicious CI job can, with trivial effort, get root access to the runner’s host OS. Awesome responsibility.
On the other hand, you can setup runners to use different users. And those users can come with their own keys to protected repos, etc., which in turn can make protected builds easier to deploy.
Choose wisely. Security is in your hands.
Register: Docker Executor
The docker setup has this set of features. It’s registration is generally along these lines:
# gitlab-ci-multi-runner register \
  --url  \
  --registration-token REGISTRATION_TOKEN \
  --description "YOUR DESCRIPTION" \
  --executor docker \
  --docker-image "docker:latest" \
  --docker-privileged
Important: In your CI YAML configuration for Docker-in-Docker builds, it is recommended that one sets the following top-level variable:
DOCKER_DRIVER: overlay. It will use the Overlay FS driver method which is faster.
These runners must be specified as privileged (recall this from the docker runner test).
In the above case, the image is just the default. You can still override the image globally or per-job in your CI Pipeline, this is just the default for the runner if none is specified. We’ll be looking at that when we setup our first CI pipeline in our next post.
Proof of Life
Once you’ve registered a runner, you can find it in your server’s Admin, Runners area.
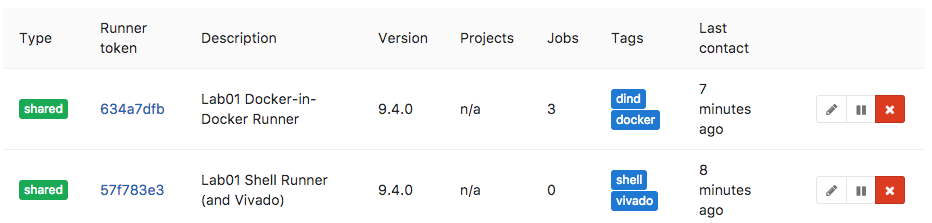
If the runner is shared, you can also find it listed in the admin area of various repositories that allow the use of shared runners.
As you can see from the image, we have a system with two runners registered so that it exposes two different environments. In this example we are also using the Tags, as described earlier, to indicate extra packages that are installed (i.e., runtime features).
Enable the Daemon
The last thing you should remember to do is enable and start the gitlab-runner daemon by whatever means is required in your host OS. For example:
# systemctl enable gitlab-runner
# service gitlab-runner start
Now the runner will always be ready to go after reboots.
Consequently, the above porcedure is one you could set to a schedule if you only want a host to be available as a runner at certain hours of the day. So imagine all that computing power you have sitting in the office suddenly springing to life at night to march thorugh dozens of build jobs for one another. 🙂
Conclusion
Three posts in and we’ve now covered everything from getting trusted SSL working on an internal network and enabling Continuous Integration features of a self-hosted GitLab server. This time, we tested running a GitLab runner locally and then added at least one runner to our CI system. Next time, we’ll dig deeper into building out a pipeline.
The GitLab Runner logo above is property of GitLab.