Today we’re continuing on with the Programmable and Persona Devices series of posts. In part 1, we detailed how to setup a Persona Device project that can be maintained by the REDHAWK IDE. Those Devices can represent individual hardware loads or portions of a single load, depending on how you setup the API between your Programmable Device and Persona(s). So today, we’ll be making a Programmable Device project.
Project Setup
The REDHAWK IDE does not currently provide a way to invoke the Programmable Device template (REDHAWK 2.2.x), so similar to the Persona project type, we’re going to do a little code generator dance to get the programmable device working in such a way that the IDE can be used to maintain it.
Starting from the REDHAWK IDE:
- File -> New -> REDHAWK Device Project
- On the New Device Project panel:
a. Select Executable Device as the device type.
b. Check the box that says Aggregate Device
c. Choose C++ as your programming language
d. Use Next and Finish until you’re viewing your newly-created project SPD.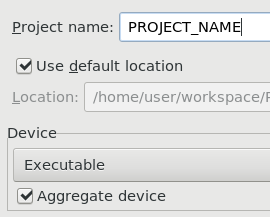
- Add the
hw_load_requestsandhw_load_statusesproperties to your PRF. - Save the project.
- Press the Generate All Implementations button. You may see compiler errors at this point; that’s fine.
- Open a terminal at the project base directory and run the code generator:
gt; redhawk-codegen -f --pgdevice PROJECT_NAME.spd.xml

Component PROJECT_NAME

      build.sh

      PROJECT_NAME.spec

    Tests PROJECT_NAME

      tests/test_PROJECT_NAME.py

    Implementation: cpp

      cpp/PROJECT_NAME.cpp

      cpp/PROJECT_NAME.h

      cpp/PROJECT_NAME_base.cpp

      cpp/PROJECT_NAME_base.h

      cpp/PROJECT_NAME_prog_base.h (added)

      cpp/entry_point.h (added)

      cpp/main.cpp

      cpp/Makefile.am

      cpp/Makefile.am.ide

      cpp/configure.ac

      cpp/build.sh

      cpp/reconf

      cpp/struct_props.h
- From the terminal, edit
cpp/.md5sumsand remove the lines forPROJECT_NAME_prog_base.handentry_point.h. - Open the Programmable Device base header (e.g.,
PROJECT_NAME_prog_base.h):
a. We are implementing this fix. Skip these steps if that patch is upstreamed.
b. Clear the contents of the class destructor method (virtual ~PROJECT_NAME_prog_base() {}).
c. In theterminatemethod, find thepersonaIter->second->releaseObject();call and add the following two lines after it:personaIter->second->_remove_ref(); personaIter->second = 0;
This project should now compile and build without errors.
API
Let’s take a look around and get familiar with the configuration of your device and its exposed API.
Open the implementation header (e.g., PROJECT_NAME.h). Note the typedef at the top; this is what establishes your hardware load API properties to your personas. If you do not define these two properties in your PRF, the code generator will not populate this section and you’ll be using the default defined in the Programmable Device base header.
Over in the implementation definition file (e.g., PROJECT_NAME.cpp), take a look at the initialize function. If you defined your own status and load properties, two lines will be uncommented that set the base class pointers to your own status structures. There is also a call for configuring the maximum number of hardware loads possible. Feel free to increase this if necessary or come up with a scheme to change it on-the-fly based on your own knowledge of what hardware files may be loaded at any given time for situations where multiple persona exist in the same hardware load.
Life Cycle
When a Persona device calls attemptToProgramParent, it results in an allocateCapacity call at the Programmable Device. The Programmable device base class breaks this process out to one simple call on your implementation class: loadHardware. That method receives a load request structure matching your API and leaves it up to you, the designer, to decide what those fields mean to you (and what it means to “load hardware”).
Similarly, when a Persona device calls attemptToUnprogramParent, it results a deallocateCapacity call at the Programmable Device, which then calls unloadHardware. Once again, it’s up to you, the designer, to decide what that means in your particular case.
Previously I was using the FPGA as an example, so let’s continue with that. More recent kernels (>= 4.x) have support for an FPGA Manager interface that at its most basic level works like this:
- Copy a bitstream binfile to
/lib/firmware. - Write flags to
/sys/class/fpga_manager/flagsindicating the type of bitstream binfile to load. - Write the name of the firmware file to load to
/sys/class/fpga_manager/firmware. - Check the status at
/sys/class/fpga_manager/status.
Your loadHardware would recreate those steps, and as for unloadHardware, maybe delete the file from /lib/firmware?? Since there’s no Clear the FPGA function, you’re left to your own devices (pun).
The generatePersona is the action, as it were, for dynamically loading the selected Persona shared library. Something important here: the third argument is the ConstructorPtr. This is what is defined over in entry_point.h. Conceivably then, if you need to be more specific than Device_impl, you could declare an abstract class API that your Programmable and Persona will be able to use for intra-process communication at runtime. For example, you could put all your OS-specific driver bind/unbind calls in your Programmable Device so that all your Personas can simply pass a list of drivers to the Programmable Device. If you go this route, your Persona Device main.cpp construct method will need to be updated to use that new entry point.
Next Steps!
We have a do-nothing Persona device from part 1 and now a do-nothing Programmable Device. Aside from a running domain, the only thing we need is a Node definition that associates the Programmable Device with some number of Personas. Let’s do that now, back in the IDE.
- File -> New -> REDHAWK Node Project
- Give it a name and select your Domain Manager, press Next.
- Select the Programmable Device you made and press Finish.
- View the Devices / Services tab of your node project and press Add… to insert the Persona from part 1.
- Select the Persona, and under Device Details, expand Parent: and choose the Programmable Device from step 3.
- Repeat 4 and 5 a few times so that you have more than one to play with.
- Save and deploy your node.

The above picture shows an example of what your node definition may look like with a single Persona.
You’re now ready to start the node however you see fit (e.g., connect to the Domain, then in Target SDR expand Nodes, right-click the one you want, select Launch Device Manager). Once it’s running, open a Python terminal and attach to the domain:
>>> from ossie.utils import redhawk
>>> dom = redhawk.attach()
>>> [d.instanceName for d in dom.devices]
['TestPersona_1', 'TestPersona_2', 'TestProgrammable_1']
If you left the maximum number of loads as 1, try allocating both personas:
>>> dom.devices[0].allocateCapacity([])
True
>>> dom.devices[1].allocateCapcity([])
False
>>> dom.devices[0].usageState; dom.devices[0].adminState
IDLE
UNLOCKED
>>> dom.devices[1].usageState; dom.devices[1].adminState
BUSY
LOCKED
As you can see, the Programmable Device is managing the Admin State, and therefore Usage State, based on the Persona base class, of each Persona based on how many it can have loaded at once. Since mine can only support 1, the second Persona is not allowed to be activated and by design will return false for any allocation while it is inactive. If we want to switch the active Persona, we have to first deallocateCapacity the active Persona, and allocateCapacity the other.
That’s it for this blog post. Next time we’ll look at setting up an FEI Persona project as well as re-visit an example from last year, the ADRV9371 EBZ Evaluation Board running on a ZynqMP (ZCU102 Evaluation Board).