We have been tracking a REDHAWK feature called the Programmable and Persona Device Pattern for a few years now. And during that time we’ve shared a few projects and stories like using the pattern to control RFNoC on an E310 (which was a demo at GRCon) as well as a few more “science fair” style projects combining Analog Devices and Xilinx evaluation boards into embedded REDHAWK systems (ZC706+AD9361, ZCU102+AD9371). We shared instructions last week for how to setup an embedded build environment for the latter, so this week we’ll start a multi-part series on how to get started with these specialized REDHAWK Devices.
In our previous posts, the Persona Devices usually took on one of two behaviors: 1) represented activating the front-end hardware, essentially representing the FEI device plus DDC (digital down converter); 2) hardware-accelerated Components (like RFNoC blocks). The first instance we’re talking about an FEI Persona, and the second instance we’re talking about an Executable Persona (something that can fork other processes, i.e., Components). For the sake of this post though, our goal is to get a Persona Device project going and discuss the lifecycle methods.
Project Setup
The 2.2.x REDHAWK IDE currently does not support using the Persona code generator that is available from the command line interface (CLI, redhawk-codegen). And conversely, using the CLI does not generate the project-specific files the IDE needs to treat the directory as an actual project. So the route we can go is to generate a REDHAWK Device of some kind, then use the CLI to re-generate the base classes so that the project is a Persona.
NOTE: These instructions are for a non-FEI Persona. That type takes going through the FEI Wizard rather than the standard Device one and will be covered in a later post.
Starting from the REDHAWK IDE:
- File -> New -> REDHAWK Device Project
- On the New Device Project panel:
a. If your Persona will represent hardware-accelerated Components, choose Executable Device as the device type.
b. Choose C++ as the programming language
c. Use Next and Finish until you’re viewing your newly-created project SPD. - From the Project’s Implementations tab, select the implementation and scroll down to Code.
a. Change the Type to Shared Library
b. Change the Entry Point and File values tocpp/libPROJECT_NAME.so(wherePROJECT_NAMEis the name you used on step 2)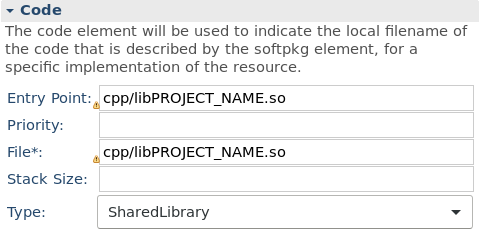
- Save your changes.
- Press the button for Generate All Implementations.
- Open a terminal at the project directory and run the following:
gt; make -C cpp distclean

gt; redhawk-codegen -f --persona PROJECT_NAME.spd.xml

        Component PROJECT_NAME

          build.sh

        PROJECT_NAME.spec

        Tests PROJECT_NAME

          tests/test_PROJECT_NAME.py

        Implementation: cpp

        cpp/PROJECT_NAME.cpp

        cpp/PROJECT_NAME.h

        cpp/PROJECT_NAME_base.cpp

        cpp/PROJECT_NAME_base.h

        cpp/main.cpp

        cpp/Makefile.am

        cpp/Makefile.am.ide

        cpp/configure.ac

        cpp/build.sh

        cpp/reconf

        cpp/PROJECT_NAME_persona_base.cpp (added)

        cpp/PROJECT_NAME_persona_base.h (added)
- Edit the
cpp/.md5sumsfile to removemain.cpp,PROJECT_NAME_persona_base.handPROJECT_NAME_persona_base.cppfrom the list.
The purpose of step 6 is to create the intermediate base class for the persona and to create the construct function in main.cpp, which is how the parent Programmable Device passes a pointer to itself to the Persona on instantiation. Your implementation class inherits from this persona class, and the persona your codegen -managed base class, so all we need to do after step 6 is convince the code generators to not delete the persona base class files the next time you run them (step 7, by deleting the lines in .md5sums). Now every time you make a change to properties, ports, etc., you can press Generate All Implementations as you usually do.
API
Open your implementation definition class (PROJECT_NAME.cpp) and take a look at the bodies of allocateCapacity and deallocateCapacity. The general flow is that if the Programmable Device has not locked the Persona, it should do some allocation work and then attempt to program (or unprogram) the parent using the two API methods: attemptToProgramParent and attemptToUnprogramParent. These two calls eventually result in the third API method, hwLoadRequest, which provides a set of properties (defined by the Programmable Device) that define what to load and on what hardware (we’ll get to these in the next blog post; these properties are an allocation on the Programmable). In fact while we’re here, let’s uncomment those lines in hwLoadRequest so that it sends back the default request structure.
The first important point is that you have considerable flexibility in the design of your Programmable and Persona devices. For example nothing says that your Persona must cause the Programmable Device to program something. The second point is that you don’t necessarily have to follow the pattern of allocate first, then program (however, you do need to call those two API methods somewhere in allocateCapacity and deallocateCapacity, respectively).
Take the FPGA, for example. It could potentially represent multiple Persona at the same time (an FEI and some hardware accelerators), and you likely need to have the FPGA programmed before you can start doing allocation work (since you probably have to probe some drivers that won’t work without the hardware, right?). So, you could adopt a pattern where one Persona causes the firmware load and other persona provide no file(s) to load. Your programmable device’s a priori design knowledge of this allows it to flexibly maintain multiple running Persona for you.
Life Cycle
We’ve already talked about 3 parts of the Persona life cycle in the API section. As with any Device, it starts and stops with allocation and deallocation of resources. First allocating the Persona which then allocates the parent Programmable device to load its specific hardware needs. The Persona pattern also provides 5 more life cycle methods that are optional to implement in your Persona base class:
void beforeHardwareProgrammed() {};
void afterHardwareProgramSuccess() {};
void afterHardwareProgramFailure() {};
void beforeHardwareUnprogrammed() {};
void afterHardwareUnprogrammed() {};
The method names are self-explanatory and provide a way to have your Persona help assist the pass or fail the attemptToProgramParent() call. Going back to the FPGA example, a Persona might ensure that drivers are unbound ahead of the Programmable Device programming the hardware (or doing whatever that means in your case). Then if that programming succeeds at the Programmable Device, the Persona would attempt to re-bind its drivers. If that fails, one could exception out of the attemptToProgramParent back to allocateCapacity and handle the problem there. (In case you’re curious why some of these methods aren’t returning booleans: I’ve wondered that too. It’s a fairly young API with room for improvement.)
So, Now What?
If you try to run this device in the Device Manager sandbox, it’s going to fail because it’s a shared library and the entry point for the Persona is not compatible with the ComponentHost that would normally execute shared library Components. Therefore the Persona device needs a Programmable Device to manage it. In this next blog post, I take you through creating the Programmable Device project, creating the parent-child relationship in a Node, and testing it.
Updated 8 July 2019 to include a link to part 2.